sales@batterydeji.com


Thank you for choosing DEJI brand battery
Please read instruction before install.
Contents
Part1
Cautions
Part2
Battery Replacement Guides
Since we are constantly improving our products, the specifications are subject to change without notice.
Satety Parameters
Limited Charging Voltage:4.35V
Discharge Cut-off Voltage:3.4V
Recommendations Charging Current:0.5C
Maximum Continuous Charging Current:0.7C
Recommendation Discharging Current:0.2C
Maximum Continuous Discharging Current:1C
Upper Limited Charging Temperature:0 +60℃
Upper Limited Discharging Temperature:-20 +60℃
Cautions
Do not throw the battery into fire to prevent explosion.
Battery is forbidden after immersing.
Do not disassemble, puncture, crush or strike the battery.
Please separate the battery and other conductive metal to prevent short circuit.
Do not expose the battery to excessive temperature.
Please use original or reliable charger.
Do not dispose batteries as household waste. Please deal with the waste batteries according to the local laws.
Battery Replacement Guides
(Use the example of IPH6S)
By installing this battery, you are agreeing to take all responsibility for any damage caused to the phone, your person, and your surrounding. By installing this battery, you are also acknowledging that many be voiding any or all warranties on your phone.
Due to limitations on space, the instructions only provides some key steps, it is unable to describe vividly how to replace the battery, In order to replace the battery more easily, we strongly recommend you to watch more relevant video about replacing the battery on YouTube before you replaced.
Step 1 Remove screws
Before disassembling your iPhone, discharge the battery below 25%, A charged lithium-ion battery can catch fire and /or explode if accidentally punctured.
Power off your iPhone before beginning disassembly.
Remove the two 3.4mm screws on the bottom edge of the iPhone, next to the Lightning connector.

Step 2 Open display assembly
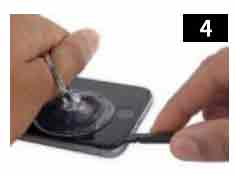
Apply a suctions cup to the lower left comer of the display assembly.
Take care not to place the suctions cup over the home bottom.

3.Pull up on the suction cup with firm, constant pressure to create as slight gap between the front panel and rear case.
Take your time and apply firm, constant force, The display assembly is a much tighter fit than most devices and is held down with adhesive.
Pulling too hard may damage the display assembly, Apply just enough pressure to create a small gap between the display assembly and the rear case.
If you have any trouble, heat the front of the iPhone using hair dryer until it’s slightly too hot too touch, This will help soften the adhesive securing the edges of the display.

4.There is a notch on the underside of the display, just about the headphone jack, This is the safest place to begin prying the phone open.
Place the flat edge of the spudger into the gap between the screen and rear case directly above the headphone jack.
5.Twist the spudger to widen the gap between the front panel assembly and the rest of the phone.

6.Insert the flat end of the spudger on the left side of the phone, between the display assembly and rear case.
Slide the spudger up the side of the phone to separate the adhesive and pop the clips free.

7.Remove the spudger and reinsert it on the bottom edge, where you pried the phone open.
Slide the spudger to the right, along the bottom edge of the phone.

8.Slide the spudger up the right side to continue separating the adhesive and popping the display clips free from the iPhone.

9.Use the suction cup to open the display, breaking the last of the adhesive.
Don’t open the display more than 90°, as it is still connected at the top by three cables that may break if stretched.

10.Pull up on the nub on the top side of the suction cup to remove it from the front panel.

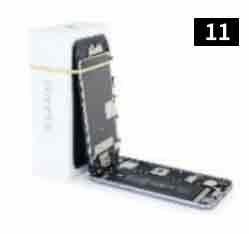
11.Gently grasp the display assembly and lift it up to open the phone, using the clips at the top of the front panel as a hinge.
Open the display to about a 90°angle, and lean it against something to keep it propped up while you’re working on the phone.
Add a rubber band to keep the display securely in place while you work, This prevents undue strain on the display cables.
In a pinch, you can use an unopened canned beverage to hold the display.
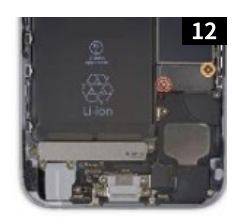
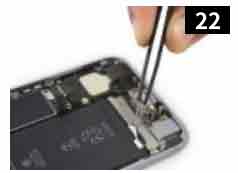
Step 3 Disconnect battery connector
12.Remove two Phillips screws securing the battery connector bracket of the following lengths:
One 2.9mm screw
One 2.2mmscrew
Throughout this installation, keep track of each screw and make sure it goes back exactly where it came from to avoid damaging your iPhone.
13.Remove the battery connector bracket from the iPhone.

14.Use the point of a spudger to disconnect the battery connector by prying it straight up from the logic board.

15.Push the battery connector away from the logic board until it stays separated from its socket, so as to avoid any accidental connection to the battery while you work.
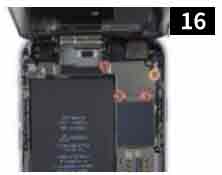
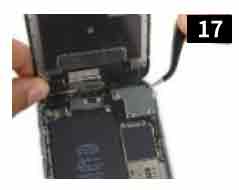
Step 4 Remove display assembly

16.Remove the following four Phillips screws securing the display cable bracket:
Three 1.2mm screws
One 2.8mm screw
Throughout this installation, keep track of each screw and make sure it goes back exactly where it came from to avoid damaging your iPhone.
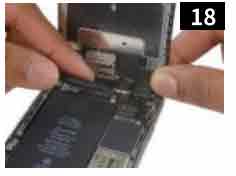
17.Remove the display cable bracket
18.Use a spudger or a clean fingernail to disconnect the front camera flex cable by prying it straight up from its socket on the logic board.
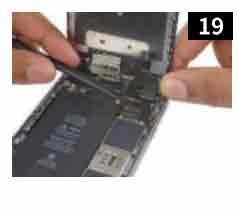
19.Disconnect the digitizer cable by prying it straight up from its socket on the logic board.
When reconnecting the digitizer cable, do not press the center of the connector, Press one end of the connector, then press the opposite end, Pressing in the center of the connector can bend the component and cause digitizer damage.
20.Make sure the battery is disconnected before you disconnect or reconnect the cable in this step.
Disconnect the display cable by prying it straight up from its socket ont he logic board.
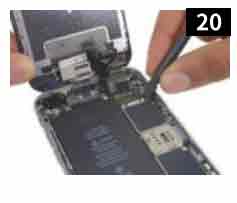
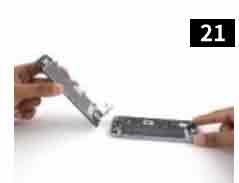
21.Remove the display assembly
Step 5 Remove battery
22.Heat the back of the iPhone using hair dryer until it’s slightly too hot to touch, This will help soften the adhesive strips between the battery and the rear case.
Use your fingers or tweezers to peel back the tips of the two adhesive strips along the bottom edge of the battery
Be careful when working near the battery: Puncturing a lithium-ion battery can release dangerous chemicals and/ or cause a fire.
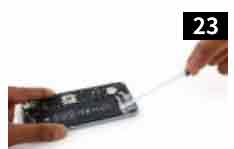
23.Try to keep the strips flat and unwrinkled during this procedure;wrinkled strips will stick together and break instead of pulling out cleanly.
Slowly pull one battery adhesive tab away from the battery, toward the bottom of the iPhone.
To avoid tearing the adhesive strip, be careful not to snag it against the battery or lower components.
Pull steadily, Maintaining constant tension on the strip until it slips out from between the battery and the rear case, For the best results, pull the strip at a 60°angle or less.
This strip will stretch to many times its original length. Continue pulling and re-grab the strip near the battery if necessary.
24.Repeat for the second strip.
Hold down the battery as you remove the second strip. or the strip may fling the battery when it separates from the case.

25.Remove the battery
Step 6 Install battery

26.Stick the adhesive strips on the back side(without logo)of the battery, then you can install the new battery and the display assembly refer to the above guide.